Synametrics Technologies
Revolving around the core of technology
Syncrify » Administrator's Guide
Syncrify Client
The Syncrify client is used to backup files from a client machine to the Syncrify server using HTTP(S) protocol. The version of Syncrify client is tied to the version of Syncrify server. We recommend you use the same version and build number for both Syncrify client and server.
Downloading Syncrify Client
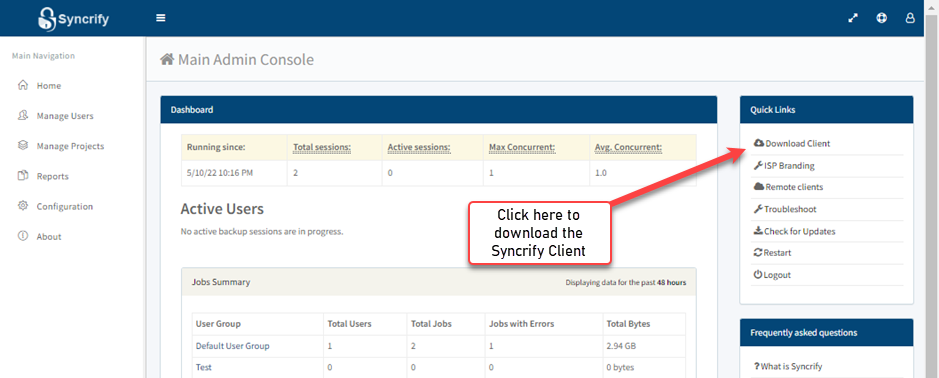
Follow the steps below to download Syncrify Client.
- Connect to the Syncrify Server machine using a web browser on the client machine. For example, if your Syncrify Server
is installed on a machine with an IP of
192.168.1.10, try typinghttp://192.168.1.10:5800in the URL. - Click Download client under Quick Links on the right hand side. See screenshot
Modes of Operation
The Syncrify client can be run in two modes:
- Web-based - This is the default mode that works for every supported operating system, including MS Windows, Mac OS X and Linux. Refer to this page for further instructions on how to run this, particularly on a headless Linux machine.
- Desktop GUI - recommended for users on Microsoft Windows and Mac OS X. You will need to disable the Web-based access in order for the client to use this mode. Refer to the documentation for web-base client for instructions.
- Console - recommended for users on Linux, UNIX and BSD
Although the command line version works across every supported operating system, you may only need to run it on a Linux machine that does not have a GUI and you don't want to use the web interface.
Refer to Using Syncrify Client from command line for detailed instructions.
The following image shows Syncrify client running using the web interface.
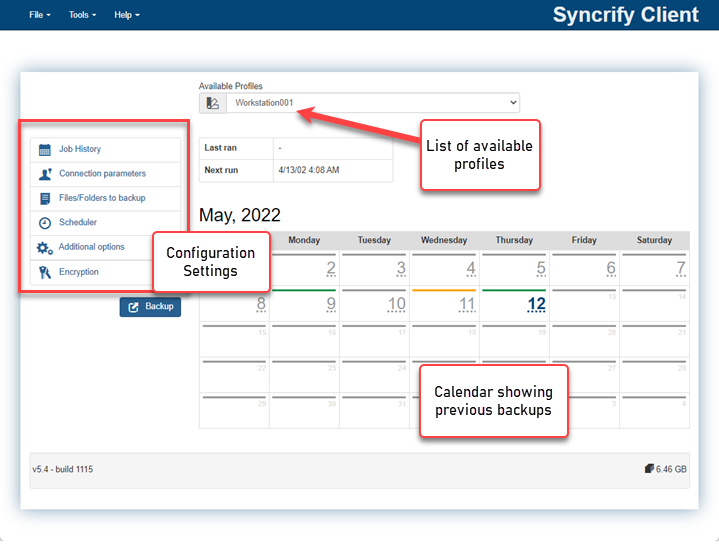
Concept of profiles
A profile defines:
- Who is backing up. An account for this user must exist in Syncrify Server.
- What to backup/synchronize. This is usually a set of folders/files.
- When to backup/synchronize.
Typically, you would only need one profile per machine for a user. However, if you wish to backup certain files at a different
schedule, you might want to create additional profiles.
Specifying backup parameters
The following parameters must be specified before a backup is performed.- Specify files to backup. This is done by either dragging a file from Windows Explorer to the
left hand side of the screen or by clicking the right mouse button and selecting
Add a folder/file menu item.
-
Current Profile Name - this automatically
populated and contains the name of the profile currently selected
- Remote Server URL - this should contain the URL for the Syncrify server. If the server is listening on port other than 80, that value must be specified following a colon. Following are some examples of a valid URL:
- http://192.168.1.20 -
This assumes the server is listening on port 80
- http://192.168.1.20:5800 -
This assumes the server is listening on port 5800
- http://backup -
Referring by the server's host name. Ensure you are able to ping the server by its name before using this value. In this case server is listening
on port 80.
- http://files.yourCompany.com - This uses the fully qualified name of the server. Ensure you are able to ping the server by its name.
- https://backup.yourCompany.com - This uses
HTTPS as the protocol and uses a fully qualified domain name for the server.
-
Login Email - This is the email
address used for the user on the Syncrify server.
-
Login Password - This is the password for the user.
-
Remote Server Path - This is a system
assigned value that is used on the server's end to store files. Most likely you will not have to modify this
value and leave it the way it is.
- Advanced Options -
To access the Advanced options, click the Advanced tab. Refer to the image below.
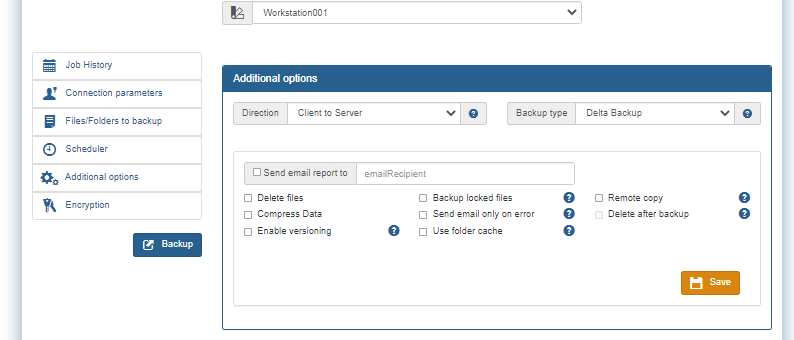
-
Delete files from server - when checked, Syncrify will delete file from the server if
the corresponding file is deleted on the client. When this is not checked, a copy will remain on the server.
-
Send notification email - Check this box if you want the Syncrify
client to generate an email when a backup is completed. The box next to the check box is used to specify the recipient(s) of the
email report. When this box is left blank, the login ID is used as the recipient address. Use a comma to separate multiple
addresses.
This email is only sent when a scheduled backup is run. Email is not generated when a user manually runs a backup. - Compress data - when checked, smart
compression is used before sending the data over the network. During the backup if no significant size reduction is gained by
compressing a file, data gets sent as-is. Consider a scenario where you have large files containing a relational database,
which can be significantly reduced in size by using compression. On the other hand, files like MP3, JPG do not reduce in size
when compression is applied. In such cases, the compression step is eliminated saving CPU cycles on both client and server.
- Enable versioning - when checked, multiple versions of every file are stored on the server.
The number of older versions maintained on the server is defined by the administrator who is managing the Syncrify server. A version is
.only created if a user modifies a file. Click here to read more about versioning.
-
Encryption - Use this tab to enable encryption and specify a password. Refer to
this document before using encryption during backup.
NOTE: Replace these URLS with the machine IP that is running Syncrify Server
Running backup manually
To run a backup on demand, simply click the Backup buttonRelated Articles
