Synametrics Technologies
Revolving around the core of technology
Backing up to a central repository
Consider a scenario where you want to backup several machines in your company to a central repository with the following design goals: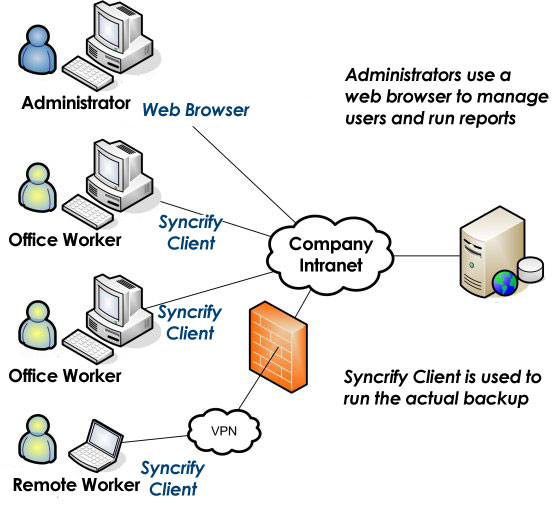
- Data from laptops, desktops and servers are backed up to a central location
- Data on the central repository must be secure
- You have several offices at multiple physical locations and you want all of them to backup their data to a central office
- Users should be able to access their files from anywhere, anytime using any device including mobile phones
Steps to accomplish this goal
Step 1 Install Syncrify Server
Designate one machine where the central repository will reside and install the Syncrify Server on this machine.
The location of this machine does not matter. As long as it is accessible over the network to other computers
on your network, you will be able to backup machines to this central repository.
This machine should have a hard drive big enough to store backed up files from different location.
Assume the host name of this machine is backup.yourCompany.com.
Step 2 Configure Syncrify
This machine should have a hard drive big enough to store backed up files from different location.
Assume the host name of this machine is backup.yourCompany.com.
After installing Syncrify, connect to the web interface using the following URL:
After initial configuration, create a user account and specify a repository path where backed up files will be stored. Let's say this user's email address is userOne@yourCompany.com.
Step 3 Configure firewall
http://localhost:5800
After initial configuration, create a user account and specify a repository path where backed up files will be stored. Let's say this user's email address is userOne@yourCompany.com.
Typically, there are two firewalls you need to configure:
Step 4 Access server from client machine
- On the machine where Syncrify server is installed. Most modern operating systems provide a built-in firewall preventing unauthorized access to the machine.
- On your network router.
If your firewalls are setup correctly, you should be able to access the server from any browser using
the following URL:
You should see the login window from any client machine. If you get an error, ensure the firewall is setup correctly and you can access the web interface of the server from the server machine itself.
Download Syncrify client from the link provided on your Syncrify server's web interface
Step 5 Install Syncrify client
http://backup.yourcompany.com:5800
You should see the login window from any client machine. If you get an error, ensure the firewall is setup correctly and you can access the web interface of the server from the server machine itself.
Download Syncrify client from the link provided on your Syncrify server's web interface
Install Syncrify client on the machine that needs to be backed up. Using the account you created in
step 2, run a test backup. Click here for details on how to use it.
Repeat this procedure and install the Syncrify client on every machine that requires to be backed up.
Repeat this procedure and install the Syncrify client on every machine that requires to be backed up.
