Synametrics Technologies
Revolving around the core of technology
Document information
| Document ID: | 1357 |
|---|---|
| Subject: | Restoring backed up files from one machine to a different |
| Creation date: | 5/28/10 3:25 PM |
| Last modified on: | 10/20/25 10:26 AM |
Restoring files (to a different machine)
Often users want to restore files that were backed up from a different machine. The following steps demonstrate how to accomplish this task using Syncrify.Assumptions
- Files from machine 1 were backed to a Syncrify server.
- The backup profile name on machine 1 is Profile1
- You want to restore these files to machine 2
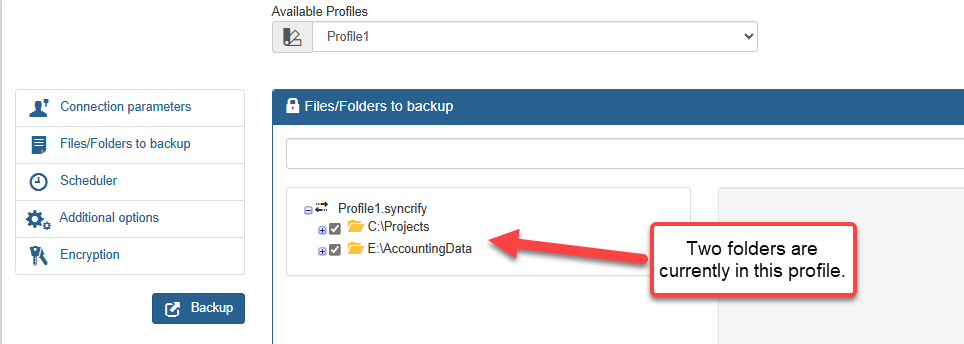
- The screen for Syncrify client on machine 1 looks like:
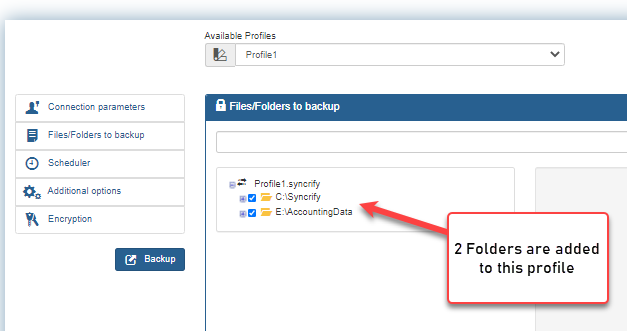
- Two folders: C:\Projects and E:\AccountingData are included in the profile.
Objective
The objective is to restore two folders that were backed up on machine 1 to machine 2. To make this example more interesting, we will restore the contents of E:\AccountingData from machine 1 to F:\AccountingData on machine 2. The following table displays the actual paths on both machines.| Folder 1 | Folder 2 | |
|---|---|---|
| Machine 1 | C:\Projects | E:\AccountingData |
| Machine 2 | C:\Projects | F:\AccountingData |
C:\Projects and E:\AccountingData are called the top-level folders.
Method 1
The simplest way to restore one or more files to any machine is to connect to Syncrify server using a web browser and download files that are required. To download any file, you can either click the right mouse button or simply double click it.This method, however, is not very convenient if you have to restore many files. That is where method two comes in.
Method 2
VERY IMPORTANT: Read this document in its entirety before using this method.Following steps demonstrate how to restore a backup created on a different machine.
- First, install Syncrify client on the machine 2.
- Ensure you can connect to Syncrify server from this machine
- Create a new profile by clicking on File, then click on Add Profile as shown below:

- Name this profile Profile1, which is identical
to what the value is on machine 1.
The easiest way to do this is to specify the server URL, login email, password and click the button with magnifying glass
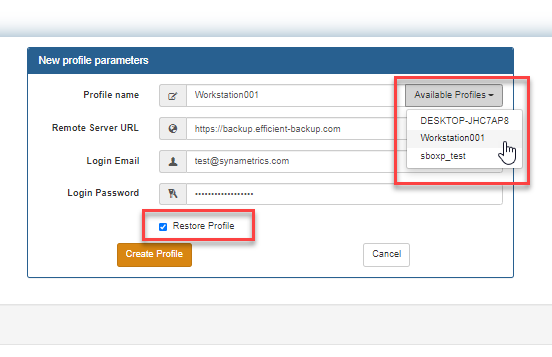
- Select the desired profile from the pop-up window
- Check the box for Restore Profile
- Next you choose the location of the files on the new machine. If you want to change the directory, click on the magnifying glass icon as shown below:
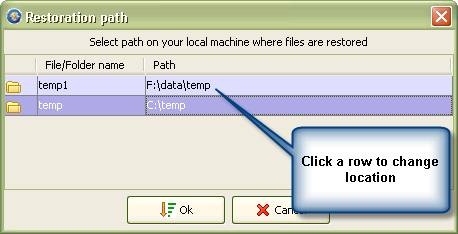 As shown above, click the icon to change the directory from E:\AccountingData to F:\AccountingData.
 - Finally, click the Restore button.
Add a comment to this document
Do you have a helpful tip related to this document that you'd like to share with other users?
Important: This area is reserved for useful tips. Therefore, do not post any questions here. Instead, use our public forums to post questions.
