Synametrics Technologies
Revolving around the core of technology
Sending files to several computers
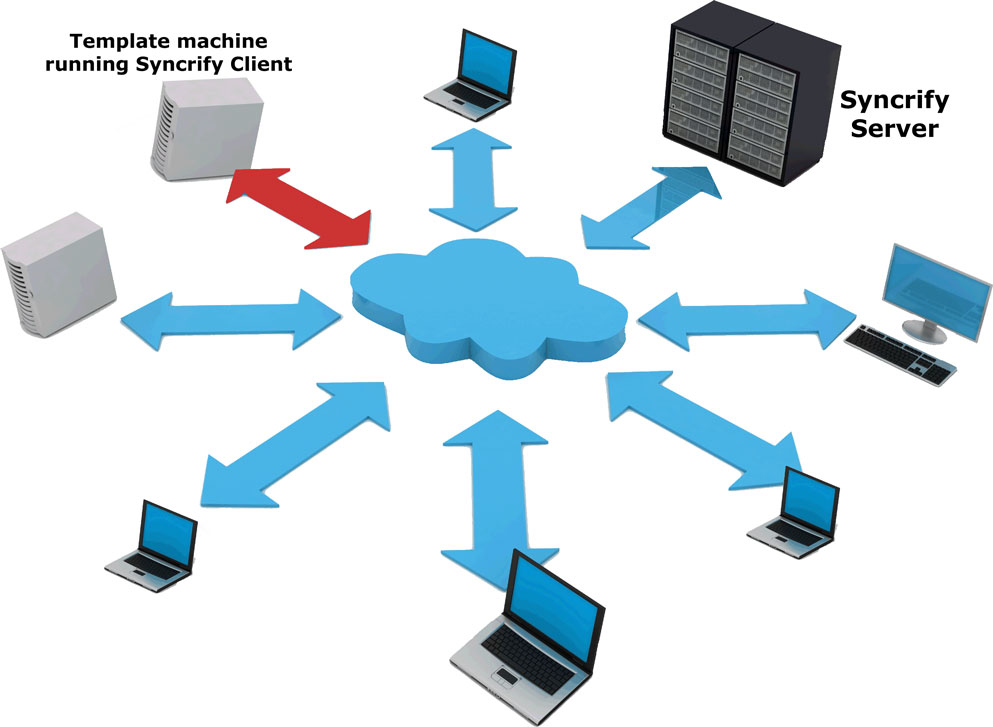 Consider a scenario where you need to push files to several computers on the Internet from a
master location. Let's call this master location the template machine and receiving computers the target
machines. This page provides step-by-step instructions on how to accomplish this goal by synchronizing files from template machine to target machines.
Consider a scenario where you need to push files to several computers on the Internet from a
master location. Let's call this master location the template machine and receiving computers the target
machines. This page provides step-by-step instructions on how to accomplish this goal by synchronizing files from template machine to target machines.
Assumptions
The following assumptions are made in this article.- Files residing on the template machine needs to be pushed to several computers on the Internet or local LAN
- The template machine will always push files while target machines will always pull them.
- There can be one or more target machines
Step-by-Step guide
Step 1 Introduce a broker machine
Although you can install the Syncrify server on the template machine, a cleaner approach is to install it on a different machine - other than
the template or any target machines. Let's call this the broker machine.
Install the Syncrify server on the broker machine. Optionally enable SSL access in Syncrify. This is done so that machines on the Internet pull their files in a secure manner. Let's assume the URL to access the broker machine is
Step 2 Configure the broker machine
Install the Syncrify server on the broker machine. Optionally enable SSL access in Syncrify. This is done so that machines on the Internet pull their files in a secure manner. Let's assume the URL to access the broker machine is
https://broker.xyz.com
Install the Syncrify server and configure the broker machine. You may have to configure the firewall at the OS level as well as the router
that is provided by your ISP. In this example, we are using the default HTTPS port, which is 443.
Try accessing the web interface using
Then, create one user account in your Syncrify. Let's say the email address of this user is userOne@xyz.com.
Step 3 Install Syncrify client on the template machine
Try accessing the web interface using
https://localhost as the URL from a browser.
Then, create one user account in your Syncrify. Let's say the email address of this user is userOne@xyz.com.
Try accessing
Step 4 Configure Syncrify client on the template machine
https://broker.xyz.com using a browser on the template machine. If you get an error accessing the page,
check the following tips for a possible resolution:
- The firewall is configured correctly to allow inbound traffic for port 443 (default port for HTTPS) for the broker machine
- Try pinging the broker machine from the client machine
By default, the Syncrify client creates a profile matching the machine's host name. Specify the Remote Server URL in this
default profile to
Create a new profile with the following values:
Step 5 Run a test backup
https://broker.xyz.com. There is no need to specify any other value in this profile. Create a new profile with the following values:
- Profile Name
- WebSync (Change this if you like)
- Remote Server URL:
- https://broker.xyz.com
- Login Email:
- userOne@xyz.com
- Login Password:
- The password you used to create userOne
- C:\Important Files
- C:\Profile files\Project One
Backup Direction
Click the Advanced tab and set the Direction field to Client to Server. This ensures files are copied from the template machine to the broker machine.
Now you are ready to run a backup. Simply click the Backup button in Syncrify client. This will
copy files from the template machine to the broker machine.
Once the backup is complete, use the browser to connect to
Step 6 Configuring the target machines
Once the backup is complete, use the browser to connect to
https://broker.xyz.com and connect
as the userOne@xyz.com. You should be able to browse through the files you just backed up.
Install Syncrify client on the target machines exactly the way you did for the template machine. Once
installation is complete, specify just the URL for the default profile. Then, create a new profile using the
following steps:
Optional step Make profile read-only
- Click Create Profile button to create a new profile.
- Specify Remote Server URL, Login Email and Login Password.
- Then click the Fetch profile button next to the Profile name field and select WebSync for the Profile name.
- Click the Restore Profile button. Click here for a screen shot.
- Ensure the path is correct on the following screen
- Very Important: Once the profile is created, click the Advanced tab and change the direction field to Server-to-client. This ensures files are pulled from the broker machine to the target machine.
Optionally, you can make the WebSync profile in this example a read-only profile with
an exception rule for the template machine. This way none of the target machines will be able to run a backup using Client-to-Server
for direction, preventing potential data corruption on the broker machine.
