Synametrics Technologies
Revolving around the core of technology
Document information
| Document ID: | 2165 |
|---|---|
| Subject: | Switching from Integrated client to service based client |
| Creation date: | 9/17/12 10:52 AM |
| Last modified on: | 11/12/18 12:49 PM |
Switching to the new service-based client
Starting from version 3.3, Syncrify offers a new service-based client that offers some unique features not available in the older versions. Prior to version 3.3, Syncrify client was called Integrated client. The new service-based client is now called Syncrify client (the phrase service-based is often not displayed in the name).An important information to keep in mind is that both Syncrify client and Integrated client are fully supported and you do not have to switch unless you want to use the new features. Therefore, before switching consider if you will benefit from the features below.
- Syncrify client runs as a Windows Service, which triggers backup jobs at scheduled time. Since Windows scheduler is no longer used, there is less configuration on the client side.
- Administrator can remotely trigger a backup job from Syncrify server's web interface.
- Administrator can submit logs from the client machine to any email address.
- Auto update - Syncrify client gets updated automatically when the server is upgraded to a new build
- Backups run silently in the background without any visual indication.
Steps to switch
STEP 1 - VERY IMPORTANTFirst, switch the location of the Data Folder to a shared directory. Older versions of Syncrify were used to specify the user's home directory to hold profiles, which won't work in the new version. Run the existing Syncrify client on machine and click the Tools menu. If see a menu item that reads Switch to shared Data folder, click it. See image below.STEP 2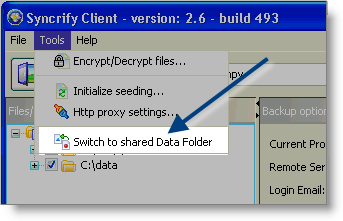
This step will move the Data Folder from user's home directory to a shared location that is accessible to every user on the machine.
It is quite possible that you may not see this menu item on your end. Ignore this step if the menu item is not visible. This means the Data folder is already in the shared location.
Click Open Data Folder under the file menu and verify the location of the Data folder is in a shared path. For example:
- C:\ProgramData\SyncrifyData - On Windows Vista, Windows 7 and Windows 2008
- C:\Documents and Settings\All Users\SyncrifyData - On Windows XP, 2003 and 2000
Uninstall the existing Syncrify client. Although this is not required, having both clients on the machine may create confusion and therefore, we recommend uninstalling the older version. Note that uninstalling a client will retain the Data Folder where all profile information is stored.STEP 3
Install the new service-based client. After installation run Syncrify Client to ensure the schedules have been ported to the new scheduler.
User comments
Posted by Michael on 6/6/14 2:45 AM
There is one important thing to consider about the server, switching from integrated to service based needs a bit more configuration as expected. Then simple checkbox in the TaskScheduler to run the backup as another user can no longer be used. I guess I need to change the service to run under another user.
Add a comment to this document
Do you have a helpful tip related to this document that you'd like to share with other users?
Important: This area is reserved for useful tips. Therefore, do not post any questions here. Instead, use our public forums to post questions.
