Secure file synchronization across Internet
Users often want to use Internet services like DropBox, Google Drive, Microsoft SkyDrive, iCloud, Box and others like them to share files that reside on multiple machines/devices. Although these services are very easy to use, they present an inherent security/privacy risk preventing large organizations from allowing their employees to use these services. Moreover, certain government regulations, such as HIPAA, prevent companies from storing their client's data to third-party companies on the Internet.
Solution
Using Syncrify you create a private cloud synchronization solution where files never leave your network allowing companies to stay HIPAA compliant and at the same time benefit from cloud based file sharing solution.
Assumptions
Consider the following scenario:
- John Doe is an employee and works on his Desktop machine running Windows 7
- He has a laptop that he uses when working from home
- While traveling he need access to these files using a browser.
- Occasionally, he needs access to his files from his iPhone
- He wants to synchronize files stored in C:\ImportantData across these machines
Following steps demonstrate how to accomplish this task.
Step 1
Designate one machine that acts as a broker. Files from individual machines (desktop, laptops and servers) will be stored on this broker machine. Install and configure Syncrify server on this broker machine. Following assumption are made for the purpose of this example:
- The host name of this machine is sync.xyz.com
- A new user is created with john.doe@xyz.com as login ID in Syncrify
- Password for this user is hiddenSecret
- The network firewall is configured to allow in-bound traffic for port 5800 to this machine
This broker machine can be anywhere on your network. As long as users can access this machine either through LAN, VPN or over the Internet they will be able to synchronize files.
Step 2
- Install Syncrify client on John's desktop that is running Windows 7.
- When Syncrify client runs for the first time, it creates a default profile. Put some garbage values for Remote Server URL, Login Email and password and save this profile. You will NOT be using this profile for this example.
- Next, click Add Profile under the File menu.
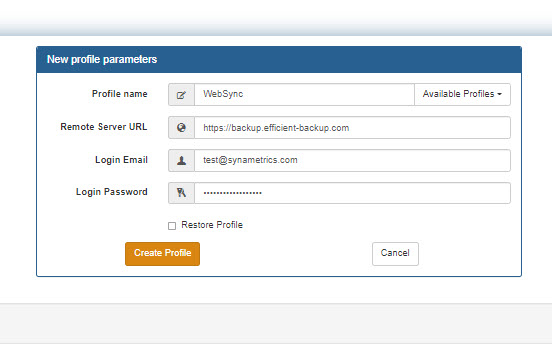
- Enter the following values on the next screen.
| Profile Name: |
WebSync |
| Remote Server URL: |
http://sync.xyz.com:5800 |
| Login Email: |
john.doe@xyz.com |
| Login Password: |
hiddenSecret |
| Restore Profile |
DO NOT check |
Click here for a screen shot.
- Click Create Profile button to create a new profile
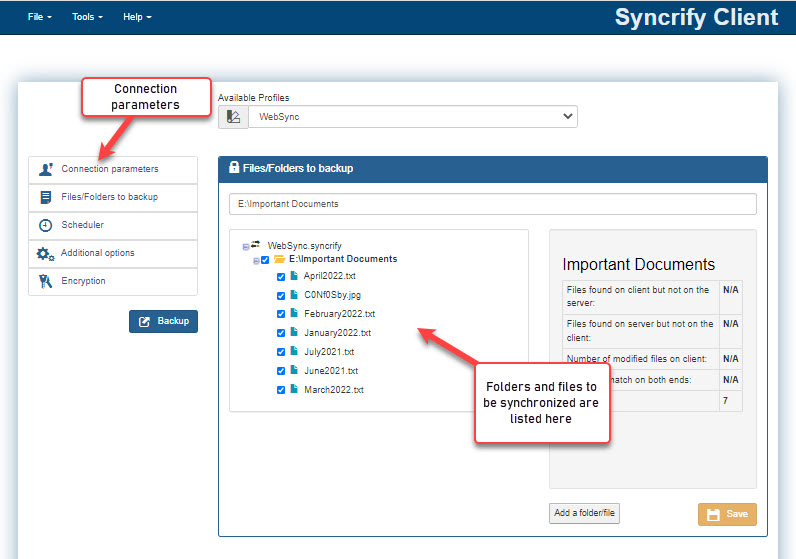
- Right click on the left hand panel and select Add folder/file from the popup menu.
- Select C:\ImportantData folder and click Ok. Click here for a screen shot.
- Click the Advanced tab and select Two-way sync for Direction. Click here for a screen shot.
- Click Backup to run a backup
- Under the Scheduler tab, select Interval for the Options field and select 10 minutes for the value. This ensures the C:\ImportantData folder is synchronized every 10 minutes.
Step 3
Follow the same steps above to setup his laptop, with one difference:
- Check the box for Restore Profile when creating a new profile. Click here for a screen shot.
- After you click the Create Profile button, Syncrify will prompt you for the path where the ImportantData folder resides on this machine. Accept the default value if the location of this folder is C:\ImportantData is same on every machine.
Accessing files
Files on his Desktop and Laptop will be synchronized automatically every 10 minutes. Accessing files from any other machine is also very easy:
- Open a web browser and type:
http://sync.xyz.com:5800
- Specify email address and password at the login screen
- Navigate to a file he wants and double click it to download
Similar steps are required for accessing files from any smart phone, such as iPhone, Android, Blackberry or Windows Mobile - meaning, open the browser on your device and put the URL for the Syncrify server.
