Synametrics Technologies
Revolving around the core of technology
Document information
| Document ID: | 4083 |
|---|---|
| Subject: | Bare Metal Backup on Windows |
| Creation date: | 1/16/15 2:59 PM |
| Last modified on: | 12/11/18 11:46 AM |
Bare Metal Backups
Starting from version 3.7, Syncrify can backup disk image to a remote machine. This Bare metal backup is tightly integrated with Windows Backup and therefore, will only work on Microsoft Windows version Vista, 7, 8, 2008 and 2012. It does not work on Windows XP, Linux or Mac OS X.
Using Bare Metal Plugin
The following pre-requisites must be met before using this feature:- Operating system must be Windows Vista, 7, 8, 2008, 2012 or above
- Windows Server Backup feature must be installed on the machine. Click here for details.
- You MUST have another local disk on the machine that is at least 1.5 times the
size of the disk you are backing up. Consider the following example:
You wish to backup C drive, which is 500GB in size to F drive. F drive must be an empty drive that is at lease 750GB in size.
How does it work?
The Bare Metal plugin in Syncrify invokes the backup integrated with Windows operating system, which creates a backup of a source drive to a destination drive. Once this backup is complete, Syncrify will copy the files to a remote machine.Use the following steps to create a Bare Metal backup.
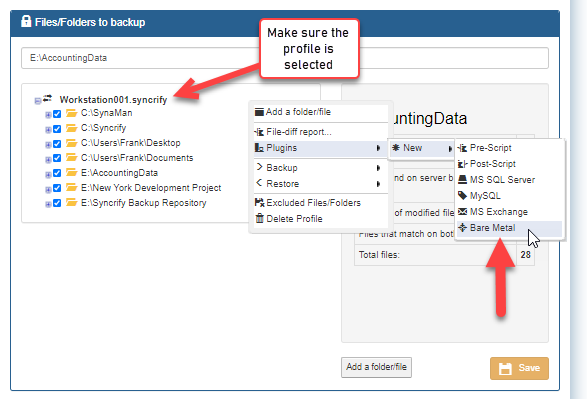
- Open Syncrify Client and select the name of the Profile in the tree-view control on the left
- Click the right mouse button and select Plugin/New/Bare Metal
- Select Source Drive - this is the one you want to backup. The Destination drive is the one where temporary backup will be stored. The capacity of the destination drive must be 1.5 times the source drive.
- Save the profile
Required Permission
Performing a Bare Metal backup on Windows is a privileged task - meaning you have to run it as an administrator. Therefore, you must run Syncrify as an Administrator when running a backup manually. This is done by clicking the right mouse button and selecting Run as Administrator from the pop-up menu.This step is not required when backups are running in the background through a scheduler. Those backup jobs are automatically elevated from the service.
Restoring disk image
Some manual work is involved when restoring Bare Metal backups. The following instructions assume the original machine has completely crashed and is inaccessible. Your goal is to restore the C drive on the machine that also contained the boot sector and operating system.Before attempting to complete an operating system or full server restoration from a drive image backup created with Syncrify, make sure of the following:
- You have a Windows Server 2008 setup/installation disc.
- If you are recovering to a new hard disk, make sure the disk is at least as big as the disk that contained the volumes that were backed up, regardless of the size of those volumes. For example, if there was only one volume that was 100 GB on a 1 TB disk during backup, you should use a disk that is at least 1 TB when restoring.
- Download the backed up files from Syncrify Server. This can be done either using the web interface or manually copying the files from Syncrify server on to an external USB drive.
Steps by steps instructions
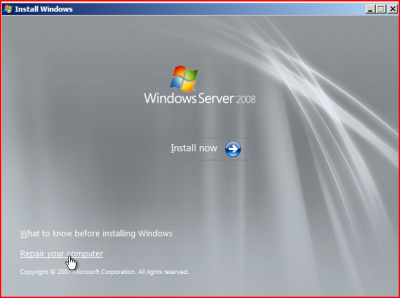
Step 1Boot from Windows machine from the installation media. Click here for a screenshot. Select the appropriate settings for:Step 2
- Language to install
- Time and currency format
- Keyboard or input format
In the next windows, select the Repair your computer option. Click here for a screenshot.Step 3
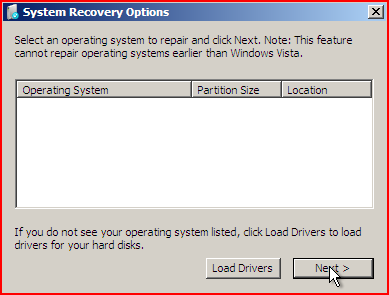
In the next step, you can load any drivers, such as RAID, if required by your hard disk. Click here for a screenshot.Step 4
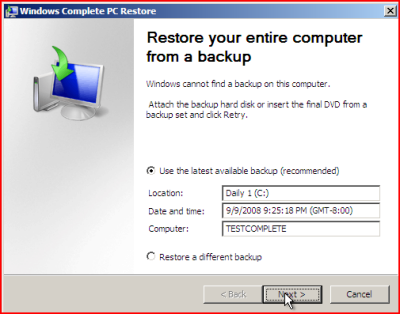
Next, select the Windows Complete PC Restore option. Click here for a screenshot.Step 5
Ensure the external USB drive containing your disk image is connected to the machine. Windows will then scan your system to see if an image is found. Try reconnecting the device containing the image if it is not found by Windows OS.Step 6
Once your backup disk has been detected, you may choose to restore the latest backup. Click here for a screenshot.Step 7
Following instructions on the screen to complete backup. Once done, your system should reboot and Windows will load.
User comments
Posted by Mat Burchett on 2/3/20 7:25 AM
This would be great if could be done without a target drive and just copied straight to syncrify server.
Posted by Matanya on 7/2/15 6:29 PM
You do not have to use a local disk, it is possible to backup to the NAS configured as iSCSI.
The problem is in the recovery process, the Windows installation disc contains no iSCSI initiator.
The solution is a bit complicated, and explained in detail in the following guide:
https://glennmatthys.wordpress.com/2012/01/07/add-iscsi-initiator-to-the-windows-server-20082008r2sbs-2008sbs-2011-installation-dvd/
Posted by Synametrics Support on 6/25/15 9:06 AM
Glenn,
Yes, Syncrify will always to a block-level backup. Meaning it will just copy the modified data within a file across the network.
Posted by Glenn Phelps on 6/25/15 1:28 AM
Will this perform differential backups to a remote offsite backup?
Posted by John on 4/28/17 10:38 PM
Sorry for asking a question on a old posting here, but I have a question about space requirements from bare metal images.
Does the server need to have an image that is the size of the hard disk or just the size of the files on the drive. For example if I had a client back up a 1TB drive but with 20GB of information on it with the bare metal backup so that I could restore windows if it came down to that would the image end up being 1TB or 20GB.
It seams like it should be 20GB but want to ask to be 100% sure before I implement this.
Add a comment to this document
Do you have a helpful tip related to this document that you'd like to share with other users?
Important: This area is reserved for useful tips. Therefore, do not post any questions here. Instead, use our public forums to post questions.
