Synametrics Technologies
Revolving around the core of technology
New Features in Syncrify 2.6
Release date: July 07, 2011
Syncrify version 2.6 introduced following new features.
- File versioning (Version 2.0)
- Disk Quotas (Version 2.0)
- Initial Seeding (Version 2.0)
- Color coded files names (Version 2.1)
- Two-way sync ( (Version 2.2)
- Enhanced reporting related to disk usage for individual users and profiles (Version 2.2)
- File-diff report (Version 2.4)
- ISP Edition of Syncrify (Version 2.4)
- Foreign language support in Syncrify client (Version 2.5)
- Backup locked files on Windows (VSS) (Version 2.6)
Creating file versions
Starting from version 2.1, multiple versions of a file can be created on the Syncrify Server. Consider the following scenario:- A user creates a new document and backs it up to the Syncrify server
- Later, the user makes changes to this document and backs up the modified version of the same file
- The Syncrify server will keep both versions of the file. The latest version is stored as-is on the server but older versions just contain the difference in the file. If a user decides to restore an older version, Syncrify server will rebuild the file on-demand.
Watch a short video demonstrating versioning in action.
Benefits of using versioning
- Users can restore a previous version of a file.
- Previous versions of a file are stored in a special format containing enough information to rebuild the file on demand, tremendously reducing disk space on the server.
Steps to use versioning
Versioning can be enabled or disabled on a per-user basis.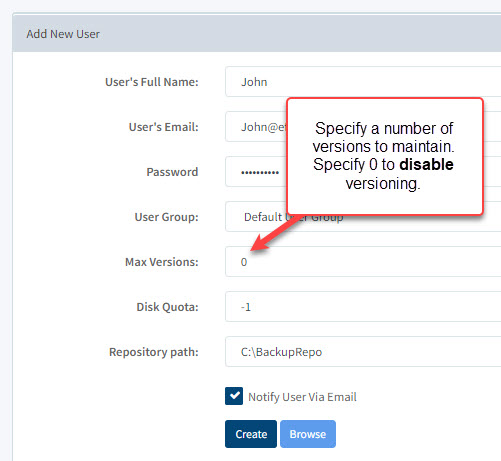 When creating a new user, the administrator must decide the number of versions to
maintain for every file. Specify a number greater than 0 to enable versioning. Assume a
backup is run every night. Specifying a value 7 for this field will create up to 7
versions of a file, each representing one day of data.
When creating a new user, the administrator must decide the number of versions to
maintain for every file. Specify a number greater than 0 to enable versioning. Assume a
backup is run every night. Specifying a value 7 for this field will create up to 7
versions of a file, each representing one day of data.
 On the client's end, versioning can be further narrowed down to a profile level. This means
you can select the profiles for which versioning is enabled. This allows users to create versions for certain types of files but not others.
On the client's end, versioning can be further narrowed down to a profile level. This means
you can select the profiles for which versioning is enabled. This allows users to create versions for certain types of files but not others.
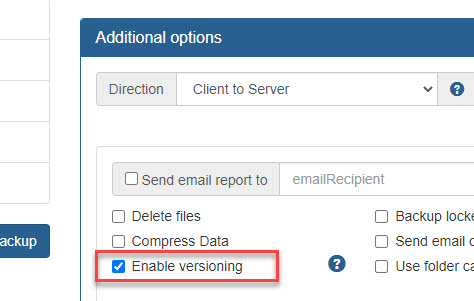
Follow the steps below to enable versioning on the client's end
- Start Syncrify client
- Select a desired profile
- Click on the advanced tab
- Check Enable versioning
- Save the profile
Caveats
It is important to note that previous file versions are automatically deleted when:- File encryption is enabled or disabled
- Encryption password is modified
- Versioning is enabled but client runs a backup job with this option disabled.
In this case, previous versions will be removed and new versions will be created
when it is enabled again.
- The option "Delete files from server" is checked
and user deletes a file from the client machine.
Restoring previous versions (Using web interface)
- Log in to the web interface using your login ID/password (this must be a non-admin account)
- Navigate to the desired file. Click the right mouse button and select Previous Versions

- Select the desired version from the list and download.

Restoring previous versions (Using Syncrify Client)
- Start Syncrify client
- Navigate to the file that you would like to restore.
- Highlight the desired file, click the right mouse button and select
Restore previous versions from the pop-up menu.

-
This will invoke a screen that displays previously backed up versions and allows users to restore the desired file.
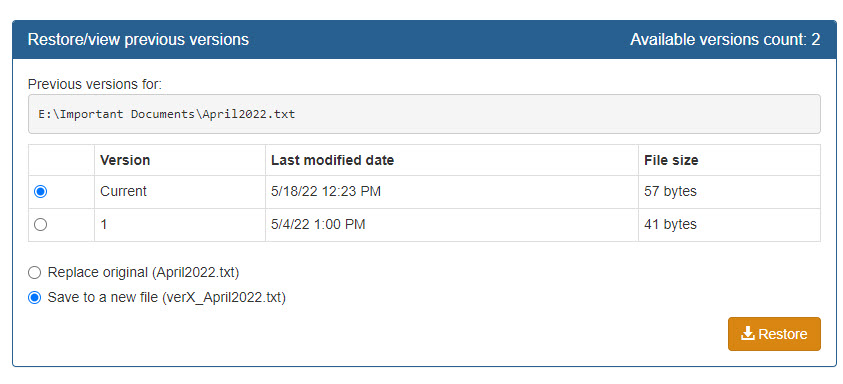
- To restore any version, select appropriate row and click the Restore button.
How are versions stored
You will see additional files on the server when versioning is enabled. These files are stored in the same folder where the actual file is stored.Assume the 5 versions of Instructions.docx exist. You will see the following files in the repository path of the user.
| File Name | File Size | Last modified date | Description |
|---|---|---|---|
| Instructions.docx | 24.5 MB | March 30, 2010 | This is the most recent version (version 5) of the file. |
| Instructions.docx.4_34233_1000_synver | 1.5 KB | March 25, 2010 | Version 4 - this is just the delta change. If user decides to restore this version, Syncrify merges this delta with version 5 and sends it back to the client. |
| Instructions.docx.3_3584_1000_synver | 2.4 KB | March 20, 2010 | Version 3 |
| Instructions.docx.2_78484_1000_synver | 2.4 KB | March 10, 2010 | Version 2 |
| Instructions.docx.1_873584_1000_synver | 2.4 KB | March 09, 2010 | Version 1 |
Disk quotas in Syncrify
Disk quotas allows administrators to limit the amount of disk space consumed by backed up files for users on the server. By default, disk quotas are disabled and every user will have an unlimited amount of disk space on the server, which is only limited by the physical space available.When a user backs up files larger than the quota specified for their account, they will receive errors when backing up. Additionally, the administrator will be sent a warning email message.
Enabling quota
The value for disk quota is specified when creating a new user or modifying existing users. The following image displays the field on the screen.
The value for disk quota is specified in bytes. You can also use acronyms to specify higher number. For example:
- kb - Kilobytes, for example 10 kb
- mb - Megabytes, for example 100 mb
- gb - Gigabytes, for example 4 gb
- tb - Terabytes, for example 1 tb
Color codes in Syncrify Client
Files names in Syncrify Client v2.1 appear in different colors indicating their backup status.
 Simply, navigate to the desired folder to display its contents. Syncrify client will display files in different colors. The following table describes the significance of every color.
| Black | Files on the client and server match with each other. If for any reason, Syncrify client is NOT able to connect to the server, file names are displayed in black. |
|---|---|
| Red | A file has been modified on the client. A backup is required to synchronize it with the server. |
| Blue | A new file on client, does not exist on the server. |
| Green | This means the file is removed from the client. You can restore it or download it from the server. |
Two-way file synchronization
Often users have to synchronize the contents of two folders on two different machines. Two-way synchronization helps you achieve this goal.
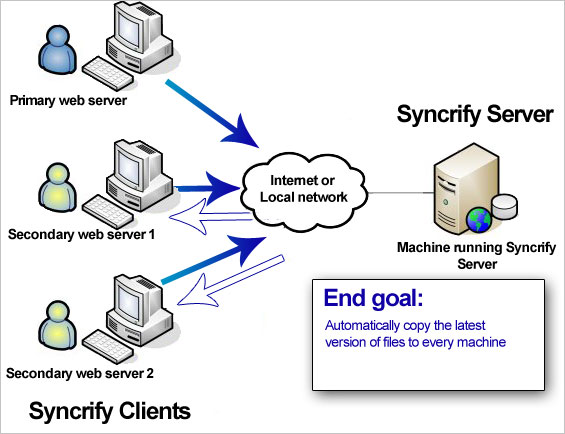 Consider a scenario where you have multiple web servers. You have one primary server and other two secondary servers. If a file changes on the primary server, you want that file to propagate to the secondary servers. This way in an event of a failure you can redirect users to one of the secondary servers.
Solution
Starting from version 2.2 of Syncrify, you can enable the Two-way synchronization option. Earlier versions of Syncrify could copy file in just one direction: from the Syncrify client to the Syncrify server. Version 2.2 can not only backup files from client to server, but can automatically update older files on the client with a newer version on the server if available.Assume you have:
- Created a new file on the primary web server.
- When a backup is running on the primary web server, this file will get copied to the Syncrify server, which is used hold your backups.
- When a backup is run on the secondary web servers, this file gets downloaded to the client machine since it does not exist.
- If you change the contents of this new file on any machine, the newer version will get copied to every other machine
Steps to use this feature
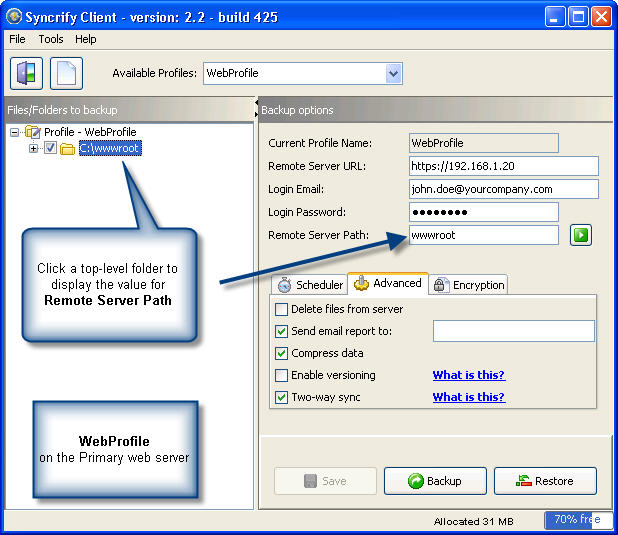
The following steps assume you want to synchronize the contents of C:\wwwroot folder between all 3 machines.- Create a new Profile on your primary web server. Let's call this profile WebProfile.
- Add C:\wwwroot to this profile
- Select Two-way Sync for the direction field.

- Save the profile
- Create the same profile on the other two secondary servers. It is important to use the same name for the profile on all three web servers.
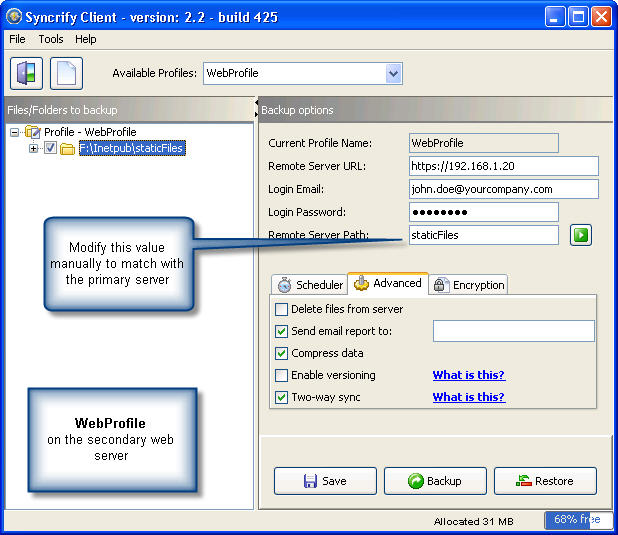
Advanced Scenario
Often you want to synchronize folders with different paths. For example, the absolute path on your primary web server is C:\wwwroot but want to use F:\Inetpub\staticfiles folder on the secondary server. The following images display a screen shot of Syncrify client on both machines.| Primary web server | Secondary web server |
|---|---|
|
|
When you add folders to a profile, the Syncrify Client automatically assigns a value for Remote Server Path, which is typically based on the leaf folder name. If the absolute paths are different between primary and secondary web servers, you will have to manually change this value to match with the primary machine.
In summary, following must match on every machine where you want to use Two-way sync feature.
- You must use the same user to run the backups
- Profile names must match. (Profile names are case-sensitive)
- Value for Remote Server Path must be same between every client machine
- Check box for Two-way sync must be checked
- Values for compression and versioning must be same across every client.
Caveats
Delete retention option is disabled when using Two-way sync. Additionally, following statements are true:- You have 3 client machines that backup a profile using two-way sync. Syncrify will ensure files on these 3 machines stay synchronized
- Besides these client machines, a copy will also be stored on Syncrify server.
- If one of the client deletes a file, that file will be deleted from every 2 other clients and one server.
- Files should never be deleted on the server manually. If a file is deleted on the server, it will reappear on the server. If you want to delete a file, you should always delete it from the client's end.
File-diff report
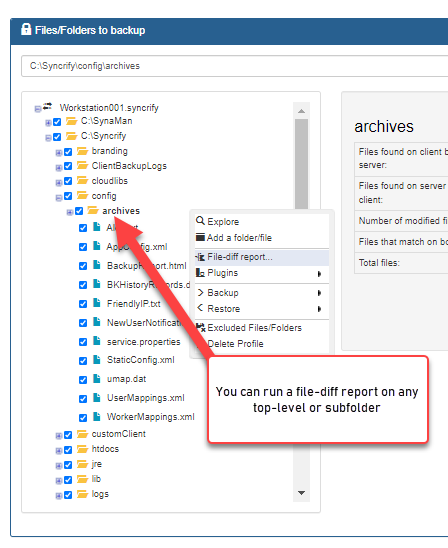
Version 2.4 of Syncrify introduced a new report in the Syncrify client that compares the file structure between the client and server machine. To initiate the report simply click the folder in Syncrify client, click the right mouse button and select File-diff report
The node you select in the existing file list affects the output of the report. For example, the report will compare data for the entire profile is you select the top-most node See image.
Similarly, by selecting a deeper folder within a profile you can restrict the report size See image.
The generated report will be created in HTML format. The amount of time required to run this report depends upon the number of files on both ends.
Following screen is displayed when you run Fie-diff report.
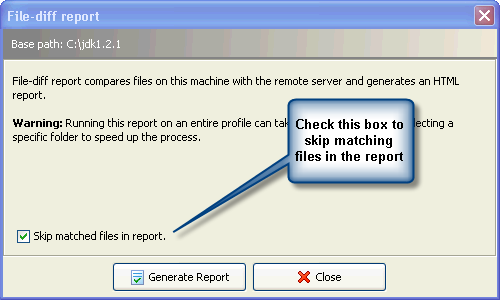
Skipping matched files
Running a File-diff report on a data set containing thousands of file can create a huge HTML report. Therefore, in order to minimize the report size, leave the checkbox selected.Aborting report
While the report is running, the title of Generate Report will change to Abort Report allowing the user to abort the report. When this report is aborted half way, it will only display the records that have been collected up until it was terminated.Running File-diff Report from the Server
Starting from v4.1 of Syncrify, you can run a File-diff report on any client from the server's web interface using the following steps:- Login as admin
- Click Remote clients under Quick Links
- Click View details for the desired client
- Click the File-Diff report button under the Action column.
- Once the report is completed, an email will be sent to the admin's email address with the report
