Synametrics Technologies
Revolving around the core of technology
Document information
| Document ID: | 4494 |
|---|---|
| Subject: | Running Syncrify on Synology NAS |
| Creation date: | 11/12/15 9:52 PM |
| Last modified on: | 5/3/22 2:00 PM |
Running Syncrify on Synology NAS
Important!
This page is now obsolete. Please refer to Downloading Synology Package for Syncrify for latest information.
It contains 3 parts:
- Installing Java JRE
- Installing and configuring Syncrify
- Starting Syncrify at boot-time
Assumptions:
This document assumes you have working knowledge of Linux operating system, such as connecting to a remote machine using SSH.Note:
An Intel CPU (x86_64) is required to fully run Syncrify on Synology. Other types, such as ARM is not supported.Prerequisite - Installing Java JRE
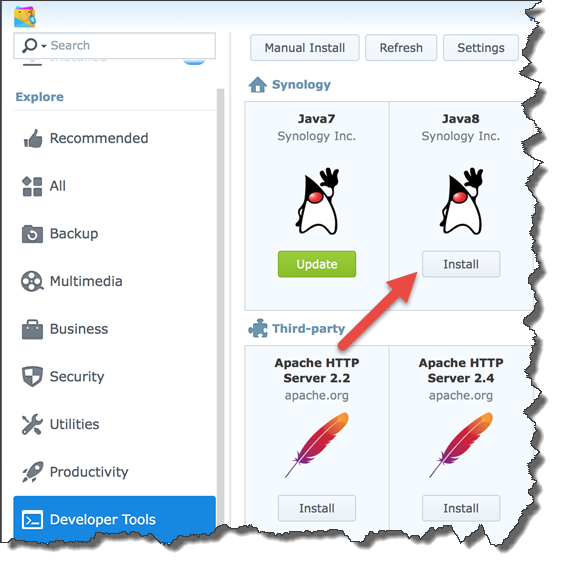
Before installing Syncrify, you need to install Java JRE. Following steps demonstrate how to install Java JRE on Synology.- Connect to Synology DSM using a browser from your Windows or MAC computer.
- Once logged in, start the Package Manager and Search for Java
- Install Java 8 - Do NOT install Java 9, Syncrify is not certified to run on Java 9 yet. See image below.
Enabling SSH
You will need to access Synology via SSH or Telnet. Obviously, SSH is preferred because it is secure. Use the following steps to enable SSH.- Open Control Panel within DSM
- Click Terminal and SNMP
- Enable SSH.
Accessing NAS through SSH
Next, open an SSH session to Synology. On Windows, you can use Putty or Terminal on Mac OS X. In this example, we will install Syncrify in /volume1/opt/Syncrify folder using the following commands:First, elevate your login to root using the following command.
sudo suNote: If you get an error complaining "sudo" is an invalid command, try using "root" instead of "admin" when establishing SSH connection. The password for "root" and "admin" should be same on Synology.
Then, create necessary folder:
mkdir /volume1/opt/Syncrify
Change directory to the newly created folder
cd /volume1/opt/Syncrify
Download Syncrify
wget http://www2.synametrics.com/files/Syncrify/SyncrifyOther.tar.gz
Next, extract compressed file using the following command
tar -zxvf SyncrifyOther.tar.gz
Launch script
Normally Syncrify runs by executing
run.sh script in the installation (/volume1/opt/Syncrify). However, our goal is to
start Syncrify when the NAS device reboots. In order to do that, we will need to modify the existing script and make some minor adjustments.
Rather than modifying the existing run.sh, we recommend you create a copy and use that instead. Let's call this copy
launchAtBoot.sh
The contents of
launchAtBoot.sh are displayed below.cd /volume1/opt/Syncrify CP= for i in `ls lib/*.jar` do CP=$CP:$i done echo $CP /var/packages/Java8/target/j2sdk-image/bin/java -server -Xmx512m -cp $CP -DLoggingConfigFile=logconfig.xml com.synametrics.sradef.BootLoader
Lines highlighted in yellow have been updated to match the environment. Other than that, there is no difference between
launchAtBoot.sh and run.sh. First, we change the current directory to the location where Syncrify is installed.
Second, we specify the absolute path for java binary. These changes allow us to run the script from any location.
TIP!
If you are not sure the path for java, type the following command:
This should display the path where java is installed, which should be used for the second (yellow) line above.
If you are not sure the path for java, type the following command:
which java
This should display the path where java is installed, which should be used for the second (yellow) line above.
Important Note
You may have to add execute permission tolaunchAtBoot.sh, which is done using
the following command:
chmod +x launchAtBoot.sh
Configuration change
Since java and the installation folder is not in System path, following changes in AppConfig.xml file are required to restart Syncrify from its web interface.- Locate AppConfig.xml file in
/volume1/opt/Syncrify/configfolder. - This file is in XML format containing several parameters. Two parameters need to be modified:
jvmPathandntServiceCommand. The parameter lines should appear like following after modification.
<parameter name="jvmPath" type="1" value="/var/packages/Java8/target/j2sdk-image/bin/java"></parameter>
<parameter name="ntServiceCommand" type="1" value="/volume1/opt/Syncrify/launchAtBoot.sh"></parameter>
- Save AppConfig.xml after modifying the values
Changing $TEMP
Syncrify needs a temporary location on the disk to perform several tasks. The default location for this TEMP folder is/tmp on Synology.
This location is not big enough, particularly if you plan to backup large files. Therefore, it is strongly recommended that you modify the
path where temporary files are stored.
For this example, we will use
/volume1/opt/SyncrifyTemp folder. Following steps demonstrate how to modify the TEMP folder in Syncrify.
- Modify or create
server.propertiesfile in/volume1/opt/Syncrify/config - Add the following line:
java.io.tmpdir=/volume1/opt/SyncrifyTemp
- Save the file
Running Syncrify at boot time
There are two ways to run Syncrify at boot time:
This method only works if you are using DSM 6.0. Consider upgrading your Synology if you are using an older build.
Starting from version 6.0, Synology DSM contains an ability to run scripts at boot time. Using this wizard, you can execute
launchAtBoot.sh when your NAS device reboots.
Step-by-Step
- Connect to Synology DSM using your browser
- Click Control Panel
- Click Task Scheduler
- Create a new Triggered Task for User-defined script
- Select Boot-up for Event and specify a name, for example Syncrify
- Select the Task Settings tab and specify
/volume1/opt/Syncrify/launchAtBoot.shfor script. Refer to the image below
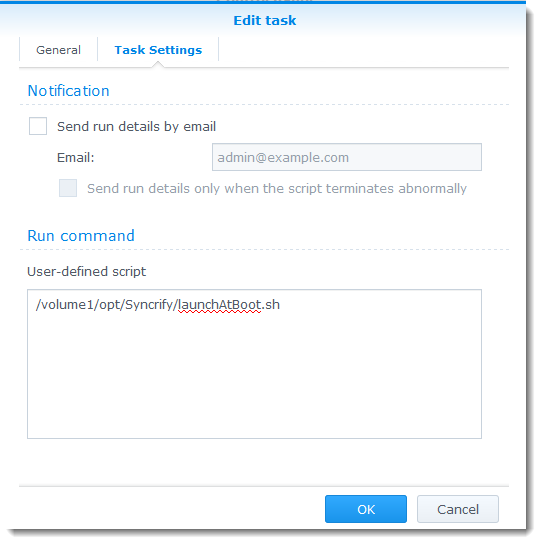
- Click Ok
Synology uses upstart daemon to execute programs at boot time.
This requires a script in
/etc/init. Let call this script syncrify.conf. It should have the following contents.description "Syncrify daemon" author "Synametrics Technologies, Inc." #start Syncrify on the following run levels start on runlevel [2345]
#stop Syncrify gracefully if the runlevel changes to 'reboot' stop on runlevel [06] #finally, execute the script exec /volume1/opt/Syncrify/launchAtBoot.sh
Testing the launch script
To start Syncrify, type the following at the prompt.
start syncrify
It does not matter what is your current directory when running
Finally, try opening start. That is because the binary is located in /sbin/ folder, should
be in your system PATH. To stop Syncrify, run:stop syncrify
http://YourSynologyNas:5800 from a browser on your desktop computer to access its web interface.
Troubleshooting common problems
An important tool in troubleshooting any problem is to see the log file, which is located in/var/log/upstart/syncrify.log . Messages printed to standard output go this file and comes handy if you run into problems.
Related Articles
Syncrify Synology PackagesUser comments
Posted by Greg Johnson on 10/17/17 9:33 PM
When I am downloading via SSH - No such file or directory. When I go to that link via a Windows machine I am able to download it. Do you know why?
ash-4.3# wget�http://www2.synametrics.com/files/Syncrify/SyncrifyOther.tar.gz
ash: wget�http://www2.synametrics.com/files/Syncrify/SyncrifyOther.tar.gz: No such file or directory
Posted by Andre on 3/10/16 9:32 AM
Hello
I've followed your tutorial step by step on my synology.
Starting the job manually i get the following error:
start: Name "com.ubuntu.Upstart" does not exist
There's no log file created with further informations.
Any advice?!
Regards
- Andr�
Posted by Markus on 2/17/19 3:20 AM
Thanks for this document!
Syncrify Server is running great for many years now.
I had an Issue with unknown CPU-Load ... I solved this Problem by adding a "&" in the run command --> "/volume1/opt/Syncrify/launchAtBoot.sh &".
Best Regards - Markus
Add a comment to this document
Do you have a helpful tip related to this document that you'd like to share with other users?
Important: This area is reserved for useful tips. Therefore, do not post any questions here. Instead, use our public forums to post questions.
