SSL Certificates
Turn on HTTPS so that passwords, queries, and results travel between browsers and SyncriTab encrypted. HTTPS needs a certificate, and SyncriTab can create, obtain, or import one for you.
How HTTPS works in SyncriTab
A certificate proves to the browser that it's talking to your SyncriTab server and lets the two encrypt everything they exchange. It's issued for a host name, such as syncritab.example.com, and users must open SyncriTab with that name for the browser to trust it.
HTTPS is controlled from the HTTP Configuration tab of the Configuration page. See Server Configuration.
- The TCP/IP port for HTTPS turns HTTPS on. Set it to
443, or0to turn HTTPS off. - The Configure Certificate... button next to it opens the HTTPS Certificate dialog, where you choose how to get a certificate.
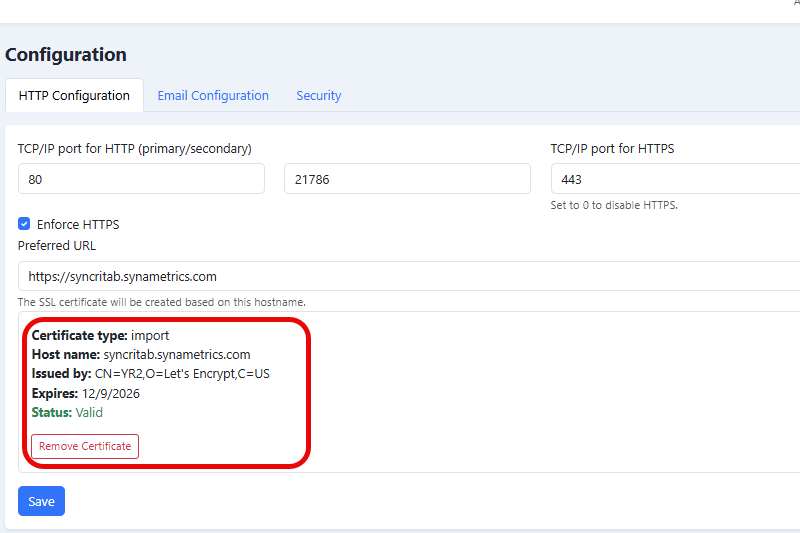
- Below the settings, a summary shows the current certificate: its type, host name, issuer, expiration date, and whether it's valid.
If HTTPS is turned on but no usable certificate is set up, SyncriTab creates a self-signed certificate for itself when it starts, so HTTPS always works. Browsers warn about self-signed certificates, so replace it with one of the other types for everyday use.
Choosing a certificate type
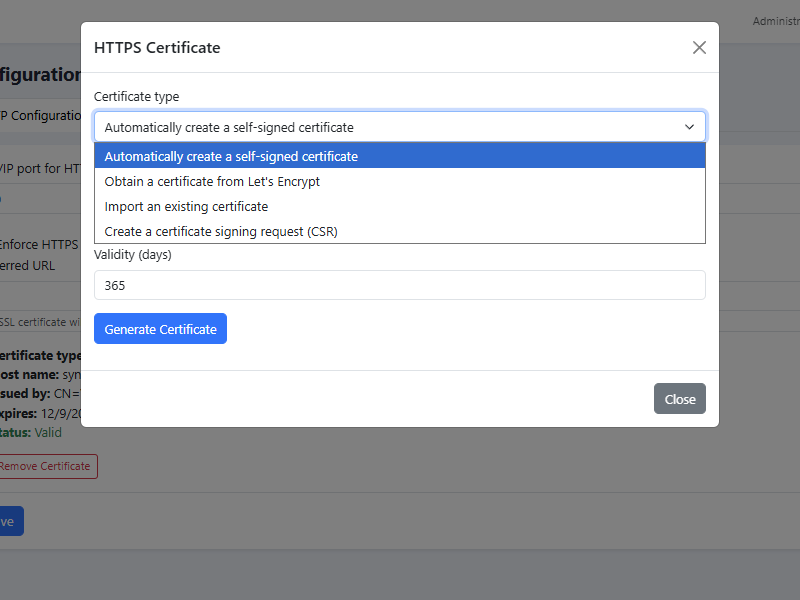
| Certificate type | Best for | Trusted by browsers |
|---|---|---|
| Automatically create a self-signed certificate | Testing, or a small internal server where you can tell users to accept the warning. | No. Browsers show a warning. |
| Obtain a certificate from Let's Encrypt | Servers with a public host name. Free, and renewed automatically. | Yes |
| Import an existing certificate | You already have a certificate, for example a wildcard certificate used on other servers. | Yes, if it's from a trusted authority. |
| Create a certificate signing request (CSR) | Your organization buys certificates or runs its own certificate authority. | Yes, if the authority is trusted. |
Before you start
- Choose the host name users will open, such as
syncritab.example.com, and make sure it resolves to the SyncriTab server in DNS. - On the HTTP Configuration tab, set TCP/IP port for HTTPS to
443, set Preferred URL to the HTTPS address, for examplehttps://syncritab.example.com, and click Save. - Allow port 443 through the server's firewall. For Let's Encrypt with web-based validation, also allow port 80 from the internet.
Creating a self-signed certificate
- On the HTTP Configuration tab, click Configure Certificate....
- In Certificate type, choose Automatically create a self-signed certificate.
- Enter the Host name. Use a DNS name your organization controls. If you leave the suggested name, it's based on the administrator's email domain, for example
syncritab.example.com. - Enter the Validity (days), from 1 to 825. The default is 365.
- Click Generate Certificate.
Users see a browser warning the first time they open SyncriTab. They can accept it, or your IT team can add the certificate to the trusted certificates on users' computers.
Getting a free certificate from Let's Encrypt
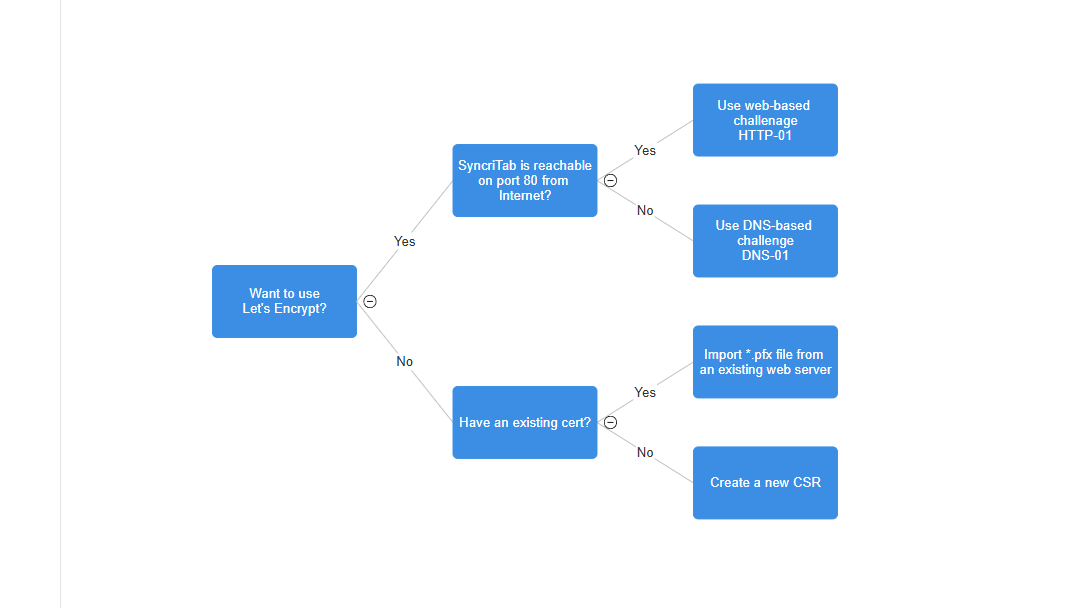
Let's Encrypt is a free certificate authority trusted by all major browsers. Before it issues a certificate, it checks that you control the host name, in one of two ways:
- Web-based (HTTP-01): Let's Encrypt connects to the host name on port 80. The host name must be reachable from the internet. Renewals are automatic.
- DNS (DNS-01): you add a TXT record to your domain's DNS. The server doesn't need to be reachable from the internet, but you must renew by hand.
Requesting the certificate
- On the HTTP Configuration tab, click Configure Certificate....
- In Certificate type, choose Obtain a certificate from Let's Encrypt, enter the Host name, choose the Challenge type, and click Start Let's Encrypt.
-
On the Let's Encrypt Certificate page, check the host name and choose how to validate it:
- HTTP - SyncriTab: SyncriTab answers Let's Encrypt itself on port 80. Use this when SyncriTab listens on port 80.
- HTTP - Another web server: another web server, such as IIS or Apache, answers on port 80 for this host name. Enter that server's Other web server root path, the folder it serves files from, so SyncriTab can place the validation file there.
- DNS: validate with a DNS TXT record.
- Click Continue, read the Let's Encrypt Subscriber Agreement, and click Agree and Create Certificate.
-
If you chose DNS, SyncriTab shows a DNS host and Value. Create a TXT record with them at your DNS provider, wait until it can be looked up publicly (this can take from a few minutes to an hour), and click Continue.
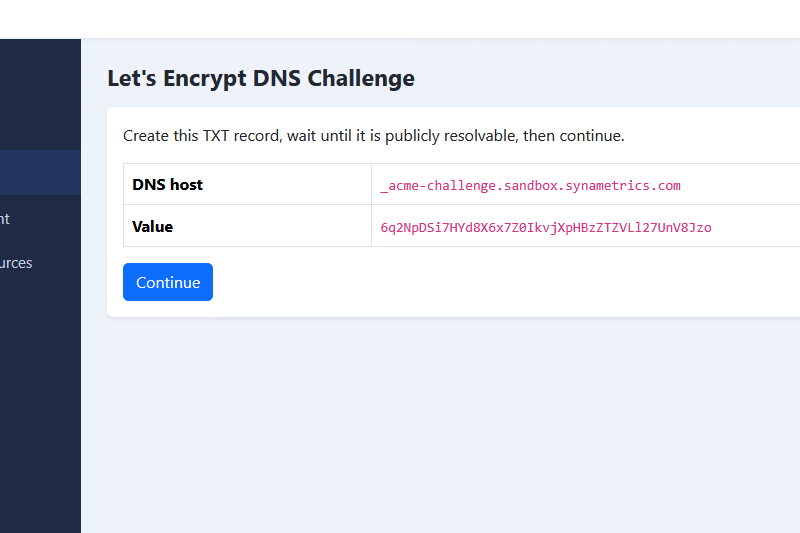
Adding the DNS TXT record for Let's Encrypt. - SyncriTab confirms that the certificate was created. If it replaced an earlier Let's Encrypt certificate, it's already in use. If it replaced a different type of certificate, such as the self-signed one, the page asks you to restart SyncriTab to start using it. See Updating & Restarting.
Let's Encrypt limits how many certificates it issues for the same host name in a short period, so check the host name, DNS, and firewall before you start, rather than retrying repeatedly after a failure.
Renewing a Let's Encrypt certificate
Let's Encrypt certificates are valid for 90 days. SyncriTab checks every day and starts renewing about 40 days after the certificate was issued, well before it expires.
- Web-based validation: SyncriTab renews the certificate, loads the new one automatically, and emails the result to the Administrator's address.
- DNS validation: SyncriTab can't update your DNS, so it emails the administrator a reminder instead. Renew by hand as described below, and update the TXT record with the new value.
To see the certificate's status or renew it yourself, click Start Let's Encrypt again in the HTTPS Certificate dialog. The status page shows the host name, the expiration date, and the next renewal date, with a Renew now button.
Renewal emails are sent to the Administrator's address through your email server, so make sure both are set up. See Email Configuration.
Importing an existing certificate
Use this if you already have a certificate and its private key, for example one exported from IIS, Apache, or another server.
- Export the certificate with its private key as a PKCS#12 file (
.pfxor.p12), or use a Java keystore (.jks). - On the HTTP Configuration tab, click Configure Certificate... and choose Import an existing certificate.
- Enter the Host name, choose the Certificate file, enter the Certificate password, and choose the Keystore type: PKCS12 for
.pfxand.p12files, or JKS. - Click Import Certificate.
An imported certificate isn't renewed automatically. Import a new one before it expires; the certificate summary on the HTTP Configuration tab shows the expiration date.
Getting a certificate from your certificate authority
If your organization buys certificates or runs its own certificate authority (CA), SyncriTab creates a certificate signing request (CSR) for you to send them. The private key never leaves the server.
- On the HTTP Configuration tab, click Configure Certificate... and choose Create a certificate signing request (CSR).
-
Fill in the request:
Field What to enter Host name The host name users will open, such as syncritab.example.com.Organization Your company's legal name. Organizational unit Optional. A department, such as IT.City Your city. State or province Written out in full, such as New Jersey.Country code The two-letter code, such as US.RSA key size 2048, 3072, or 4096 bits. 2048 is accepted everywhere; larger keys are stronger but slightly slower. Additional DNS names Optional. Other names users may open, separated by commas, such as syncritab, syncritab.corp.example.com. - Click Create CSR, then Download CSR.
- Send the CSR file to your certificate authority, following its instructions.
- When you receive the signed certificate, open the dialog again. Under Signed certificate and chain, choose the file (
.pem,.cer, or.crt) and click Install Signed Certificate. Include the authority's intermediate certificates in the file if they sent them separately.
Like an imported certificate, it isn't renewed automatically. Create a new request before it expires.
After installing a certificate
- SyncriTab tells you whether the new certificate is already in use or whether you need to restart SyncriTab first.
- Open
https://your-host-namein a browser and check that it loads without a certificate warning. - When HTTPS works, select Enforce HTTPS on the HTTP Configuration tab so that plain HTTP addresses are redirected to HTTPS.
Removing a certificate
In the certificate summary on the HTTP Configuration tab, click Remove Certificate and confirm. HTTPS may keep using the certificate until SyncriTab restarts. If HTTPS is still turned on when SyncriTab restarts, it goes back to the previous certificate if one is available, or otherwise creates a new self-signed certificate. To stop using HTTPS, also set the HTTPS port to 0.
Troubleshooting
| Problem | What to check |
|---|---|
| The browser warns that the certificate isn't trusted. | A self-signed certificate is in use. Get a trusted certificate from Let's Encrypt or your certificate authority. |
| The browser warns that the name doesn't match. | Users are opening SyncriTab with a different name than the certificate's host name, for example an IP address. Use the host name, or add the other names to the certificate. |
| Let's Encrypt web-based validation fails. | The host name must resolve to this server from the internet, and port 80 must be open and answered by SyncriTab or the other web server you chose. |
| Let's Encrypt DNS validation fails. | The TXT record may not be visible yet. Wait longer, check it with an online DNS lookup tool, and try again. |
| HTTPS stopped working after the certificate expired. | Open SyncriTab on the primary HTTP port, http://server:21786, and install a new certificate. |