JDBC Drivers
SyncriTab talks to each type of database through a JDBC driver. Many drivers are ready to use; DB Managers can install others from a database vendor.
Drivers that come with SyncriTab
Included with SyncriTab. These drivers are installed with SyncriTab and ready to use:
- Microsoft SQL Server
- MySQL and MariaDB
- SQLite, H2, HyperSQL DB, and Apache Derby
SyncriTab drivers, downloaded when first used. These drivers are named SyncriTab followed by the database name. They're published by Progress Software and licensed by Synametrics to ship with SyncriTab, so they're included at no additional cost to you. To learn more about them, visit Progress JDBC drivers.
- Oracle, PostgreSQL, IBM DB2, IBM Informix, Sybase, Greenplum, and Progress OpenEdge
- Snowflake, Amazon Redshift, and Google BigQuery
- Apache Hive, Apache Spark SQL, Apache Cassandra, Impala, and Denodo
- Salesforce, Microsoft Dynamics 365, SAP S/4HANA, Jira, Eloqua, and Google Analytics 4
To keep the installation small, these drivers aren't copied to the server until they're needed. They appear with (download pending) in the driver list, and SyncriTab downloads one automatically the first time someone saves a data source that uses it. The server needs internet access for that download.
For any other database, install the JDBC driver from the database vendor, as described below.
The Manage JDBC Drivers dialog
Sign in as a DB Manager, click Manage Data Sources in the side menu, and then click Manage JDBC Drivers. The dialog lists the installed drivers:
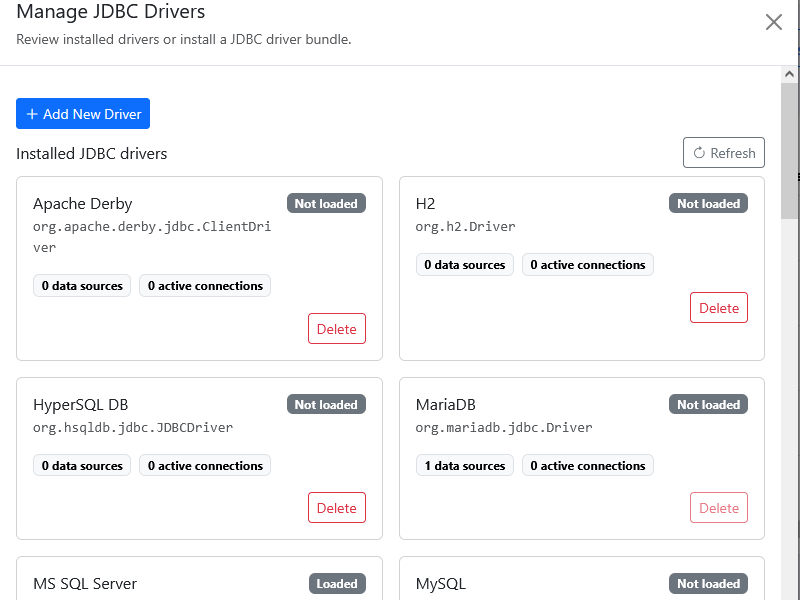
- Status: Loaded means a driver is in use now. Not loaded means it will load the next time it's needed. Retired means an older version that was replaced but is still used by open connections. Download pending means it will download on first use.
- Usage: how many data sources use each driver, and how many connections are open.
Installing a driver
A JDBC driver is program code that runs on the SyncriTab server. Install drivers only from the database vendor or another source you trust, and check the file's hash or signature against the one the vendor publishes.
Before you start, download the driver from the vendor. It's usually one JAR file, but some drivers need extra JAR files as well; the vendor's documentation lists them. Installing takes five steps:
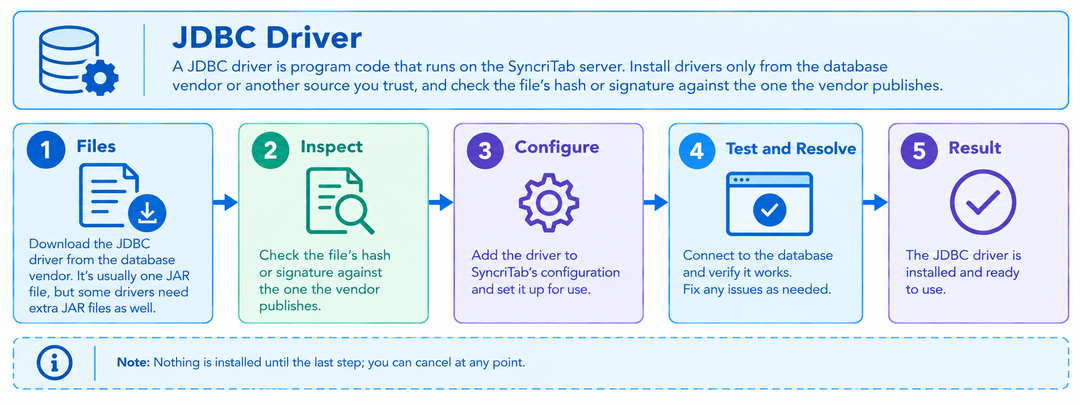
Step 1: Select the driver files
- In Manage JDBC Drivers, click Add New Driver.
- Under Primary driver JAR, choose the JAR that contains the driver itself.
- If the driver needs other JARs, add them under Supporting JARs.
- Click Inspect Files.
You can upload up to 16 JAR files, each up to 50 MB and 100 MB in total.
Step 2: Review the inspection
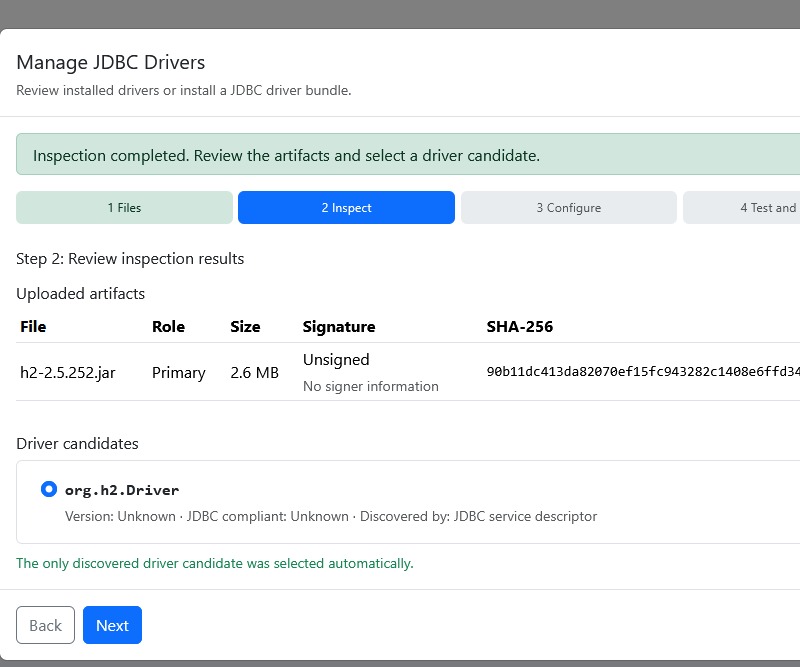
SyncriTab examines the files without installing them and shows:
- Uploaded artifacts: each file's size, whether it's digitally signed and by whom, and its SHA-256 hash. Compare the hash with the one on the vendor's website.
- Inspection warnings: classes SyncriTab couldn't load. A warning usually means a supporting JAR is missing.
- Driver candidates: the driver classes found in the files. If there's only one, it's selected for you; otherwise, choose the one the vendor's documentation names.
Step 3: Configure the driver
- Friendly driver name: the name shown in the JDBC Driver list when creating data sources, such as
Teradata. - JDBC URL pattern: the driver's connection URL, from the vendor's documentation, with placeholders for the parts that change between data sources. Each placeholder becomes a field when someone creates a data source.
A placeholder is written as {Label|Default value|Type}, where the type is S for text, N for a number, or B for yes/no (with a default of true or false). For example:
jdbc:teradata://{Server Host|localhost|S}/DBS_PORT={Port|1025|N},DATABASE={Database|dbc|S}As you type, SyncriTab lists the placeholders and shows a live preview of the URL.
If the driver expects the user name and password inside the URL rather than separately, select This driver expects credentials in the JDBC URL and include exactly {Username||S} and {Password||S} in the pattern. These are filled in only when a developer connects and are never saved.
Step 4: Test and resolve conflicts
- Optional connection test: enter a test URL and a database user name and password, and click Test Connection. The test uses the uploaded files before they're installed, and nothing you enter is saved.
- Conflicts: SyncriTab checks whether an installed driver has the same driver class or name. Then choose Install as a new JDBC driver, or Replace installed driver to update an existing one. See Updating a driver.
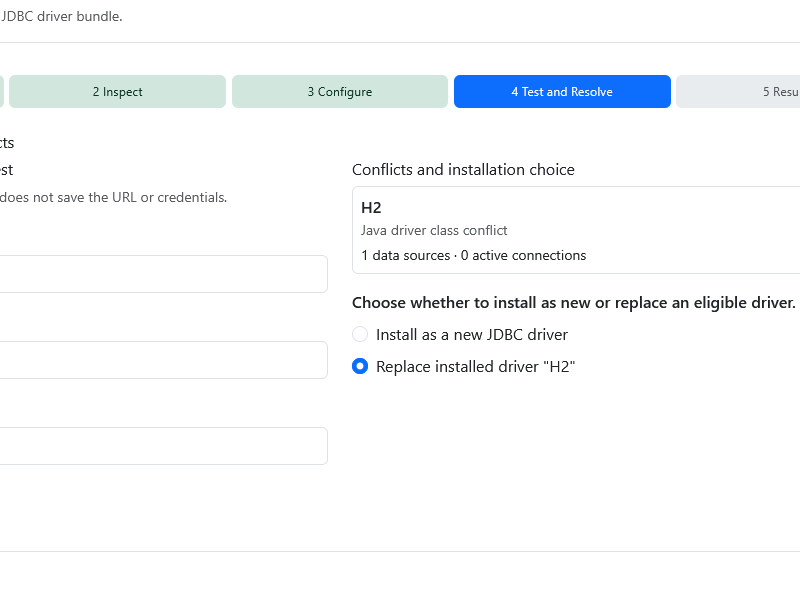
Click Install Driver and confirm.
Step 5: Result
SyncriTab shows the installed driver's name, class, version, and files. The driver is usually available immediately; create a data source with it on the Manage Data Sources page. If SyncriTab says a restart is required, restart it before using the driver. See Restarting SyncriTab.
Uploaded files that aren't installed are discarded after two hours, so finish the steps in one sitting.
Updating a driver
To update a driver to a newer version from the vendor, install the new files and, in step 4, choose Replace installed driver. Data sources that use the driver keep working and switch to the new version.
- The new version must use the same driver class. If the vendor changed the class name, install it as a new driver and create new data sources that use it, because a data source's driver can't be changed.
- You can't replace a driver while developers have connections open with it. Ask them to disconnect, then try again.
Deleting a driver
In the installed driver list, click Delete and confirm. You can delete a driver only when no data source uses it and no connection is open with it. To delete a driver that's still in use, first delete or change the data sources that use it.