Installing SyncriTab
Install SyncriTab on Windows or Linux, or run it in Docker, then open it in your browser for the first time.
You install SyncriTab once, on the server your team will use. Users don't install anything; they open SyncriTab in a web browser. The installer includes its own Java runtime, so you don't need to install Java first.
Before you begin
- Check that the server meets the System Requirements.
- Make sure you can sign in to the server as an administrator (Windows) or as
rootor a user who can runsudo(Linux). - Allow incoming connections on TCP port
21786in the server's firewall. SyncriTab uses this port until you set up other ports. See Network access. - Windows: download
SyncriTab.zip, which contains the setup programsetup.exe, from the SyncriTab website. - Linux: you don't need to download anything in advance. The installation command downloads SyncriTab for you, so the server needs internet access and the
curlcommand. - Docker: the Docker host needs Docker and internet access to build the image. See Running SyncriTab in Docker.
Installing on Windows
- Extract
setup.exefromSyncriTab.zip. - Right-click
setup.exeand choose Run as administrator. If Windows asks whether to allow the app to make changes, click Yes. - Follow the steps in the setup program. When asked for a destination folder, accept the default,
C:\Program Files\SyncriTab, or choose another folder on a disk with room for your data. - Click Install. The setup program copies the files and registers SyncriTab as a Windows service named
SyncriTab. - Click Finish. Your browser opens SyncriTab at
http://localhost:21786. If the page doesn't load yet, wait a few seconds for the service to start, then refresh the page.
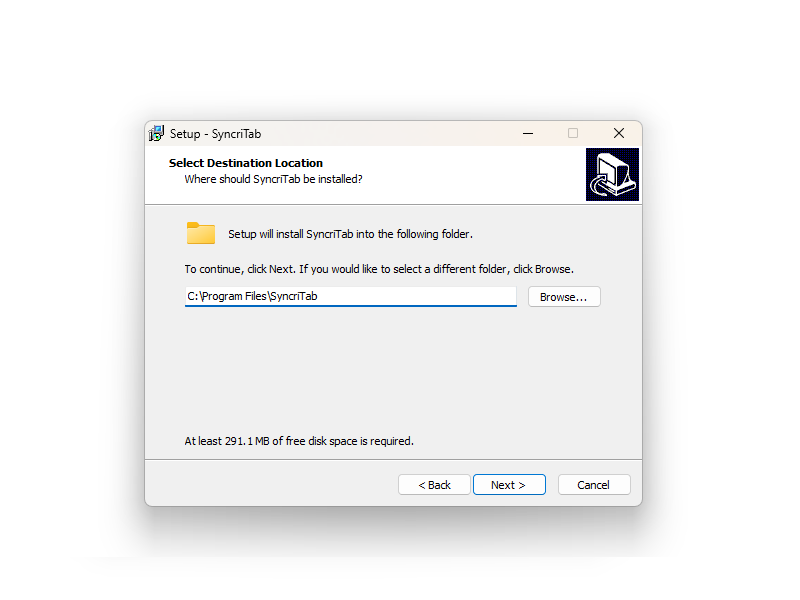
The setup program also adds a SyncriTab shortcut to the Start menu. It opens SyncriTab in your browser on the server itself.
Starting and stopping SyncriTab on Windows
SyncriTab runs as the SyncriTab Windows service and starts automatically when Windows starts. To start, stop, or restart it, use the Services console (services.msc), or run one of these commands in a Command Prompt opened as administrator:
net stop SyncriTab
net start SyncriTab
Administrators can also restart SyncriTab from its About page. See Updating & Restarting.
Installing on Linux
The Linux installer works on 64-bit distributions that use systemd, such as Ubuntu, Debian, Red Hat Enterprise Linux, Rocky Linux, Fedora, and Linux Mint.
-
On the server, run this command:
It downloads the SyncriTab installer from Synametrics and runs it ascurl -fsSL https://web.synametrics.com/files/syncritab-install.sh | sudo shroot. Ifsudoasks for a password, enter your own Linux password. - Answer the installer's questions. To accept a default, press Enter.
Question Default What it means Installation directory /opt/SyncriTabWhere SyncriTab and its data are stored. Choose a disk with room for your data. OS user to run SyncriTab as syncritabThe Linux account that runs the SyncriTab service. If the account doesn't exist, the installer creates it as a system account. - Wait for the installer to finish. It prints a summary that includes the address of the web interface, for example
http://192.168.1.20:21786.
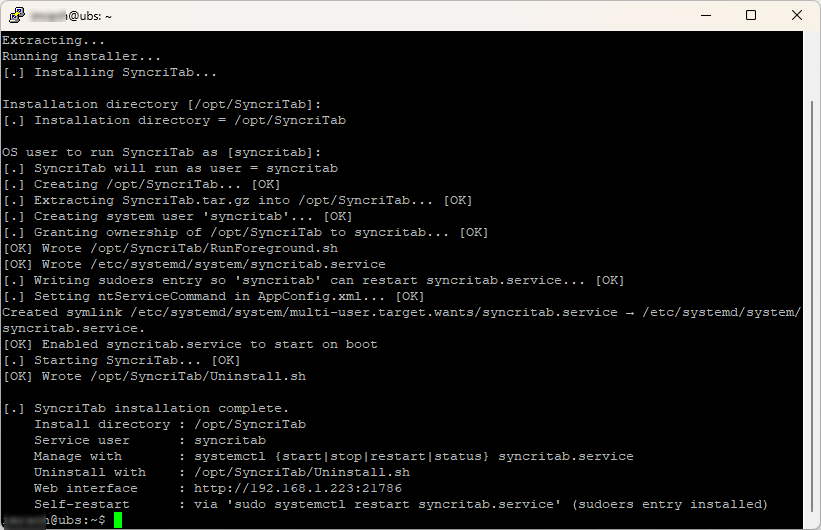
To read the installer before you run it, download it first, review it, and then run it:
curl -fsSL https://web.synametrics.com/files/syncritab-install.sh -o syncritab-install.sh
less syncritab-install.sh
sudo sh syncritab-install.sh
The installer does the following for you:
- Downloads SyncriTab, extracts it into the installation directory, and gives the service user ownership of it.
- Registers a
systemdservice namedsyncritabthat starts when the server boots, and starts it. - Lets the service use ports 80 and 443 later without running as
root. - Lets SyncriTab restart its own service, so the Restart button on the About page works.
- Creates an uninstall script,
Uninstall.sh, in the installation directory.
Starting and stopping SyncriTab on Linux
Manage the service with systemctl:
sudo systemctl status syncritab
sudo systemctl stop syncritab
sudo systemctl start syncritab
sudo systemctl restart syncritab
If the service doesn't start, view its most recent messages:
sudo journalctl -u syncritab -n 50Linux without systemd
If the server doesn't use systemd, the installer displays a warning and installs SyncriTab as a traditional init.d service instead. In this case, SyncriTab runs as root, and the installer doesn't ask for a service user. Manage the service with:
sudo /etc/init.d/syncritab {start|stop|restart|status}Running SyncriTab in Docker
Synametrics publishes a Dockerfile for SyncriTab in the SyncriTabDocker repository on GitHub. You build the image from it on your Docker host. The image is based on the Eclipse Temurin Java 21 runtime and downloads the latest SyncriTab release while it builds.
-
Download the repository and open its folder:
If you don't havegit clone https://github.com/Synametrics/SyncriTabDocker.git cd SyncriTabDockergit, download the repository as a ZIP file from GitHub and extract it instead. -
Build the image:
docker build -t syncritab-server . -
Start a container. This command keeps SyncriTab's data in a Docker volume named
syncritab-data, and restarts the container automatically if it stops or the host restarts:docker run -d \ --name syncritab-server \ --restart unless-stopped \ -v syncritab-data:/opt/SyncriTab \ -p 21786:21786 -p 80:80 -p 443:443 \ syncritab-server - Open
http://docker-host:21786in your browser and continue with Initial Setup.
Ports
Each -p option maps a port on the Docker host to a port in the container:
| Container port | Used for |
|---|---|
21786 | HTTP. This is the only port SyncriTab uses when it first starts, so it's always required. |
80 | HTTP, after an administrator turns it on |
443 | HTTPS, after an administrator turns it on |
If a port is already in use on the host, map a different host port to it. For example, -p 8443:443 makes HTTPS available on port 8443 of the host. You can leave out -p 80:80 and -p 443:443 if you don't plan to turn those ports on.
Where your data is stored
The container keeps the entire SyncriTab installation folder, /opt/SyncriTab, on the volume, including settings, users, data sources, JDBC drivers, certificates, logs, and everything your users save. The first time the container starts with an empty volume, it copies the SyncriTab files into it. Because the data lives on the volume, you can remove and re-create the container without losing it.
To keep the data in a folder of your choice instead of a Docker-managed volume, use a bind mount:
# Linux or macOS host
-v /srv/syncritab-data:/opt/SyncriTab

# Windows host
-v C:\syncritab-data:/opt/SyncriTab
Always use a volume or a bind mount in production. Without one, all of SyncriTab's data is lost when the container is removed.
Managing the container
docker stop syncritab-server       # stop SyncriTab
docker start syncritab-server      # start it again
docker logs -f syncritab-server    # follow the log output
To back up the syncritab-data volume to a file named syncritab-backup.tar.gz in the current folder:
docker run --rm -v syncritab-data:/data -v "$(pwd)":/backup ubuntu \
  tar czf /backup/syncritab-backup.tar.gz -C /data .
For more options, see the README in the SyncriTabDocker repository.
Opening SyncriTab for the first time
When the service is running, open SyncriTab in a web browser:
- On the server itself:
http://localhost:21786 - From another computer:
http://server-name-or-IP:21786
The first page you see is Welcome to SyncriTab, where you create the administrator account. Continue with Initial Setup.
If the page doesn't load:
- Wait a few seconds and refresh. The service can take a moment to start.
- Check that SyncriTab is running, as described above for Windows, Linux, or Docker.
- If it works on the server but not from another computer, check that the server's firewall allows port
21786. - Look for errors in the
logsfolder in the installation directory.
For more help, see Troubleshooting.
The installation folder
The installation folder contains the program and, by default, everything SyncriTab saves. Include it in your server backups.
| Folder | Contents |
|---|---|
config | Server settings, users, and data sources |
htdocs | The web interface |
JdbcDrivers | JDBC drivers, both the included drivers and those added by managers |
jre | The Java runtime used by SyncriTab |
lib | Program files |
logs | Log files, useful for troubleshooting and support requests |
patches | Files used when SyncriTab is updated |
plugins | Database-specific support for SQL Server, Oracle, MySQL, and other databases |
As people use SyncriTab, it creates more folders here for saved scripts, saved sessions, query history, exported files, and its internal database.
Uninstalling SyncriTab
Back up first. The installation folder holds your settings, users, data sources, and everything your users saved. Copy it somewhere safe before you uninstall, in case you need it later.
Windows
- Open Settings › Apps › Installed apps (or Control Panel › Programs and Features).
- Find SyncriTab and choose Uninstall.
The uninstaller stops and removes the SyncriTab service and removes the installed program files. Files that SyncriTab created after installation, such as your settings and saved data, may remain in the installation folder. Delete the folder if you no longer need them.
Linux
Run the uninstall script from the installation directory:
sudo /opt/SyncriTab/Uninstall.shThe script stops and removes the syncritab service and deletes the entire installation directory, including all saved data. It leaves the service user account in place. To remove that account and its home folder too, run:
sudo userdel -r syncritabDocker
Stop and remove the container:
docker stop syncritab-server
docker rm syncritab-server
This leaves your data in the syncritab-data volume, so you can start a new container with it later. To delete the data permanently, remove the volume too:
docker volume rm syncritab-dataNext steps
Continue with Initial Setup to create the administrator account and activate SyncriTab.