Synametrics Technologies
Revolving around the core of technology
Document information
| Document ID: | 1579 |
|---|---|
| Subject: | Manually upgrading Syncrify to the latest version |
| Creation date: | 12/9/10 11:34 AM |
| Last modified on: | 11/12/18 12:27 PM |
Manually upgrading Syncrify
This page demonstrates step-by-step instructions on how to upgrade Syncrify client as well as server to a custom build.Steps to upgrade Syncrify server
Prerequisite
You will needSyncrifyManualUpdate.zip file before
proceeding. Contact our support department to obtain this file.
Patching instructions if you're using v5.2 or above.
- Log in as admin to the web interface.
- Click Check for updates under Quick Links on the right-hand side.
- You will see the following message.
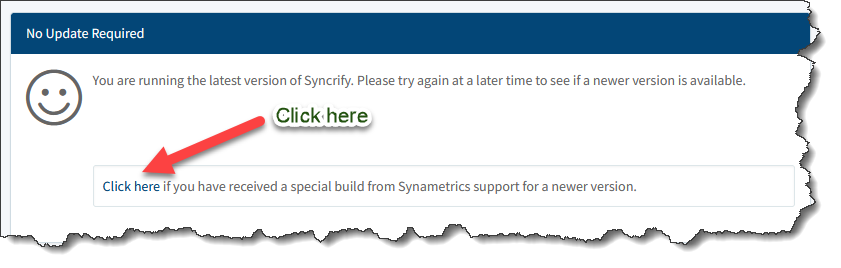
- Click the Browse button on the following screen, select
SyncrifyManualUpdate.zipthat was sent to you by our support department and finally, click Upload. - Restart Syncrify once the file has been uploaded.
Patching instructions if you're using an older version.
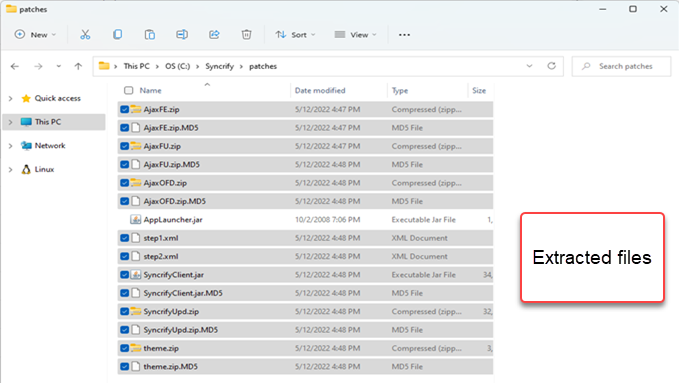
- Download SyncrifyManualUpdate.zip using the link provided by our support department.
- Extract the contents of this file to $INSTALLDIR\patches folder. $INSTALLDIR is the location where Syncrify is installed.
- The following image display these files.
- Then, log in to Syncrify's web interface as admin
- Click the link to Restart on the right hand side
- Watch the $INSTALLDIR/patches folder as Syncrify is restarting. Every file except AppLauncher.jar should disappear.
- Confirm the new build number once Syncrify server is up and running again.
Steps to upgrade Syncrify client
Very Important
If you are using a branded client, contact our support department and ask for a branded version of your Syncrify client. Failure to do that will cause the clients to not upgrade themselves.Upgrading service-based client
No special steps are required. The client should get upgraded automatically.
Upgrading integrated client (deprecated)
You need is to replace the existing copy of SyncrifyClient.jar with the newer version.
A copy of this file can be found in
We recommend you make a backup before replacing it in case you need to rollback. This file is located in the folder where you have installed Syncrify client. Following table show the default location for Syncrify client on different operating systems.
$INSTALL_DIR/customClients folder on the machine where Syncrify Server is running.
We recommend you make a backup before replacing it in case you need to rollback. This file is located in the folder where you have installed Syncrify client. Following table show the default location for Syncrify client on different operating systems.
| Microsoft Windows | C:\Program Files\SyncrifyBackupClient\ |
|---|---|
| Apple Mac OS X | /Applications/SyncrifyClient.app/Content/Resources/Java/ |
| Linux and other UNIX | Where ever you decided to install Syncrify client |
Add a comment to this document
Do you have a helpful tip related to this document that you'd like to share with other users?
Important: This area is reserved for useful tips. Therefore, do not post any questions here. Instead, use our public forums to post questions.
